Pages

Sunday, June 17, 2012

Another "Sweet P"

When I posted "What is a Sweet P?" I said that the "P" stands for our last name, meaning my sweet husband, kids, even the dog.  Well, when my dad emailed me and asked that since the kids call him "Pop Pop" is that considered one of the "P's" I realized, of course it is!  So sorry about that oversight...

And while we're on the subject of dads... Dad, are you reading this?  I want to wish you a very Happy Father's Day, and I am glad to actually be spending it with you after so many years!  I might mention that my dad lives kinda far away - or, since I'm the one that moved away 22 years ago, I'm the one that lives kinda far away, but we happen to be on a little visit right now. I guess if I didn't move, though, chances are I wouldn't have had his only grandchildren, so I guess he's gotta be okay with it, because he really loves them so much!  Now, go fire up the grill, Dad!

I guess I should mention that there is another "P" out there... my husband's father, my father-in-law, who the kids call "Papi"!  Happy Father's Day if you're reading this!  We miss you all the way down in FL!

There is one other person I really want to send a shout out to this Father's Day... even though we are more than likely in the same room right now... my wonderful husband & father to my beautiful daughters.  They are all daddy's girls and love him to pieces : )  Since we would be out of town for actual Father's Day, we surprised him with "Fake Father's Day" last weekend that included mini-golf (since none of us girls "really" golf), bowling, dinner and Jenga (but not just any game of Jenga - he knows what I'm talkin' about...)  We love you!

Happy Father's Day to all dads, including my brothers-in-law, uncles, cousins and friends - enjoy your day!

Dads Rock!

(and I guess I should forever amend my definition of "What is a Sweet P?" to include all of my favorite peeps  ; )


Friday, June 15, 2012

Is it Royal or is it Glaze? A Royal Glaze Tutorial...


Royal too hard and crunchy for you?  Glaze too runny or not opaque enough?  Icing taking too long to dry?  These things were all my nemeses (is that even a word?), so began my quest for a happy medium.  An icing medium - one that I could create wonderful cookie art with.  After my cookie friend Bonnie mentioned that she adds a little corn syrup to her RI, I began tweaking (I do a lot of that) until I had, for me, a perfect, one consistency icing that gives me no heartache (knock on wood!!!)  I would like to share it with you today - what I like to call Royal Glaze.  Some who have tried this recipe really love it, and yet others, for lack of a better word, meh....  (If you are comfortable with and used to glaze, this may not be for you - it dries much quicker.  That may be a good thing, but takes some getting used to!)  I would say it behaves more on the royal-ish side, but while packable and stackable, it dries quicker, and with the addition of a little glycerin it is softer to bite into.  And I have never (knock on wood again!) had any bleeding or blotching with Royal Glaze.  So, if you'd like to give it a go, here it is...

*************

  • First, and most obvious step, gather your ingredients:
          5 T Meringue Powder
          3/4 t Cream of Tartar
          3/4 C warm water (less for a thicker consistency)
          2# 10X Cane Powdered Sugar (such as Domino)
          1/4 C corn syrup
          1 T Glycerin (like Wilton - NOT drugstore glycerin!)
          1 t flavoring of choice (I use vanilla and butter)
          *White food coloring gel (like Americolor)
             *optional, I use about 12 drops
  • Sift powdered sugar into the bowl you will mix in - I use a strainer - it only takes a minute to do & no mess.
  • Combine meringue powder and cream of tartar; pour the water into that, and whisk for about 30 seconds.  I like to use a teeny whisk in a measuring cup.

*************
  • Pour that mixture into the powdered sugar - I like to run it through the strainer in case any little lumps remain - then I use a spatula & smoosh the rest through the strainer.
  • Give the mixture a little stir to make it wet enough that it won't poof up when you start to mix.
  • Mix on LOW with PADDLE attachment for 10 minutes.  During these 10 minutes, you will add the rest of the ingredients...

...like the corn syrup, glycerin, flavorings and white food gel.
You may want to scrape down the bowl & paddle once everything is added.


*************

For some reason the videos are not showing on my iPad but they are fine on my PC.
I hope you are able to view them...  sorry about that, will try to get it fixed!

When it's done, it should look like this:
(please excuse my videography!)


I consider Royal Glaze a 12-15 second icing, but I must count
fast because the video is only 11 seconds... I did shake the
bowl a little at the end too 'cause I was about to drop the camera...


*************

I like to pour it all into a gallon Ziploc - makes it easier to work on colors without it crusting.


*************
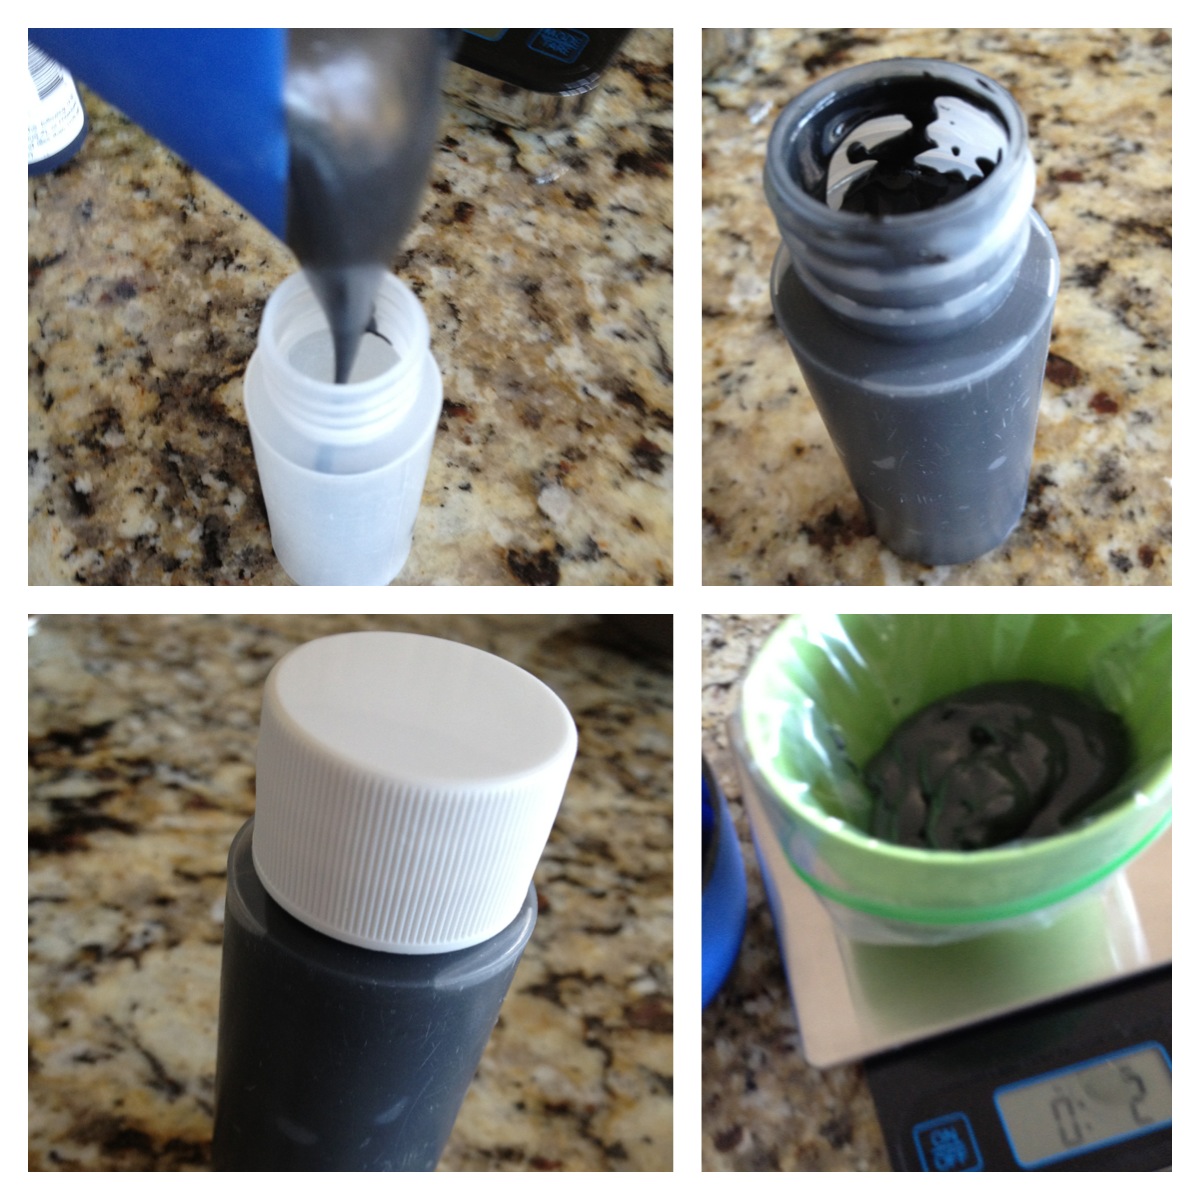
  • I use bottles, and since the small holds 2oz and the large holds 8 oz, these are the amounts I divide it all up into.
  • First, I put a cup on the scale (weighs 2.75 oz) - I then reset the scale to 0 (tare weight) so when I pour my icing in, I only get the weight of the icing. 
  • After kneading the gallon bag a little to break up any air bubbles, I snip the corner off the Ziploc, and pour in the amount of icing I want.


*************

  • Then, using a very damp paper towel over the snipped corner, I use a clothes-pin to hold it closed.  This way, there is no crusting while you are working on your colors.


*************
  • Now, mix your colors.  Notice in the bottom left picture the icing looks black, but when I pulled the spoon out you can see it is not mixed enough.  Keep mixing until the color is solid.  Colors will intensify with time, so if your black is almost-black, that's ok.  Now would be the time to add water if you wanted a thinner consistency.

*************
  • I either pour it into my bottles & cap for storing in the fridge for a day or so, put the couplers/tips/covers on for immediate use, or pour into smaller Ziplocs to freeze for later use. 
  • I also weigh at the end when I make a lot of a color, and then store it in smaller amounts.
  • Tip: don't fill bottles all the way to the top - if you need to stir the icing, you will want some room in there so it doesn't come out the top.  I like to use bamboo skewers to stir : )

*************
  • While it's a lot of work to get red, white requires no mixing - straight to a bottle or Ziploc & that's it.  Love white : )
  • So, when you're done, your gallon bag will be empty, and your colors are ready to use or freeze. 
  • When freezing I always put a label on the bag so I know when it was made.

*************

Then I put all of those into a freezer Ziploc or Tupperware container, and into the freezer they go! I have a side-by-side fridge, so the freezer is really narrow.  These stack great in there.  Oh, and what's with that piece of parchment with the little gobs of icing on it, you ask?  Well, I always put a little fresh-made or mixed icing on parchment as a test - to make sure it dries properly & nothing went wrong with the icing.  Better to know before than after decorating all those cookies!


*************

I use this as a one-consistency icing (same for outline, flood and detail) by using different sized tips - large (3-5) for flooding, smaller (00-2) for details.  Makes about 5 cups (or 5 - 8oz bottles / 20 - 2oz bottles) - dries between 6-10 hours, less for minis.  Depends on how thick you flood - I like to ice thick, so average sized cookies are usually done in about 8 hours, 10 if all black or red or a color that needed a LOT of gel to color it, and around 6 for minis.  Of course, high humidity may add time to that, so plan accordingly : )  Love that I can decorate in the morning, and deliver in the evening!
*************

Oh, and last but not least, more dishes. Oh, girls...

*************

HAPPY ICING!

Disclaimer...
I will more than likely update this post 'cause there may be additional tips I have forgotten to mention...
not on purpose of course...


Tuesday, June 12, 2012

It's Hot as an Oven in Here!

Not because it's 89 degrees today, but because the oven is, in fact, on!  Baking on hot days is, well, depressing, isn't it?  You just can't get away from the heat.  So, I have a system in place to bake as quickly as I can with my single oven, one sheet at a time...  (maybe one day the baking fairy will bring me a new convection oven...so I can bake, like, 4 pans at a time...)  Don't think I'm nuts - after having done it a few hundred times (ok, more...!) it really works for me!

First, pre-heat your oven, but beware... even though your oven may signal that it's ready, it probably isn't... Here my thermometer reads 325 even though my oven tells me it's 350.  It takes another 15 minutes for it to get to 350... (my oven isn't even that old - most ovens are just fickle!)


Cutouts are chilling in the fridge... oven is (truly) ready - it's GO TIME!
  1. Fill pan #1 with cutouts (don't over-fill or they may spread, or burn.) 
  2. Bake, set for half the bake time & turn at halfway point.  Set timer for the rest of bake time. 
  3. When timer signals 1-minute-to-go, take pan #2 and fill with cutouts.
  4. Take pan #1 out of oven when done - while oven is open, stick pan #2 in oven.
  5. When timer signals 1-minute-to-go-at-halfway move cookies from pan #1 to a cooling rack.
  6. Turn pan #2 in oven (this is halfway-point).  Back to pan #1...
  7. Move pan #1 to a cool spot - wipe down any oils from silicone baking mat if using.
  8. By the time the timer signals 1-minute-to-go on pan #2 (baking), pan #1 is cooled - fill with cutouts.
  9. REPEAT from step 4, alternating pan #1 and pan #2.
OK, it looks crazy, but it really does work... plus, I get a little bit of a workout : )


don't forget...
DON'T OVERFILL YOUR PANS!


Monday, June 11, 2012

Cut it Out!

Sorry about that - the kids are home for the summer, and are fighting over the remote already! Luckily, I'm not measuring or doing brain surgery anything that requires too much concentration... today, I'm cutting dough.  Nothing too exciting, but a very important task indeed! Lots of people have luck cutting soft dough, but not me... I need to have that dough good and chilled to get clean cuts, and for transferring it to the pans. There's nothing worse than your cutouts flopping over & getting all mis-shapen with finger-pokes...  From my last post you saw that I have rolled and chilled my dough, so I am all ready to go!   Work with one sheet of dough at a time - it thaws pretty quickly, so don't work with really large batches unless you are superwoman quick, or cutting really BIG cookies! I like to cut right on the parchment that the dough chilled on, and I dip the cutter in some flour to help prevent sticking (this might help hold the cookie's shape a little while baking - theory unproven...). Push down as straight as you can, otherwise cookies will be lopsided & edges won't be straight (theory proven...) and there you have it! Cut as many out of a sheet of dough as you can so you don't have too much re-rolling to do.  Sometimes the cutout stays on the table, & sometimes it comes up with the cutter. Either way, I'm OK since my dough is chilled, & not likely to lose its shape by either lifting it or popping it out of the cutter. I then lay these on a cookie sheet, as many as I can get on a sheet, and put them back in the fridge to stay chilled while I finish cutting. If you like to chill your baking sheets before baking (I don't), lay the cutouts as you would for baking, with enough room in between each cookie (2" is recommended), & just pop them into the oven straight from the fridge when you're ready. If not baking right away, cover cutouts with some Saran (if layering make sure the bottom layers are chilled to prevent smooshing -  separated by layers of lightly floured parchment to prevent sticking) or layer in Tupperware (see photo) and keep in the fridge until baking time, or package well and freeze.  To freeze cutouts, I layer the chilled cutouts in Tupperware same as for chilling in the fridge (see same photo) - and then put the whole thing into a 2-gallon freezer Ziploc & straight into the freezer.  Voila! 


(don't mind my wobbly-looking sheet of cut dough... these particular square cutters are graduated and are wider on the outside, making the surrounding dough "move" - as you can see, the cutouts are actually square : )