Pages

Wednesday, September 26, 2012

Coffee Break and a Giveaway!


After a very busy month, I figured I deserve a coffee break.  With donuts.  So, using my new Latte cutter from Plastics in Print (fondly known to the cookie world as "PIP") I thought I would cheat just a little & make coffee and donut cookies.  Pretty simple, except when you are doing a bajillion other things at the same time and decorate your one main cookie all wrong and have to scrape it off and decorate the back of the cookie... Nope, that didn't happen here... ok, so what if it did... (if I was smart I would have made an extra, but I really wasn't expecting to completely ruin it!)  Speaking of which, I used a Boo-Boo stick from Karen's Cookies to scrape the icing off - I love those sticks!  I really like how this set eventually turned out... and in a BRPBoxShop cookie box, too cute not to send to someone who needs a coffee break in life!  I guess I could have done the Starbuck's logo on there but after my icing mishap, I decided not to test my luck...  Here's a quick tutorial, IKEA style - pics only, minus the little guy...


*****
 

So, do you have someone in mind to send a Coffee Break box to?  I thought so... that's why I'm going to do a Coffee Break Giveaway!  Here's what you'll get to help you make this set, should you be the lucky winner:


  • a PIP 3.5" Latte cutter, generously donated by Plastics in Print - thanks Patrick!
  • 2 CK icing bottles with couplers and caps, and a pack of Boo-Boo sticks, generously donated by Karen's Cookies - thanks Mike & Karen!
  • 6 (7X4.5X1") white window cookie boxes & lids, generously donated by BRPBoxShop - thanks Connie!

...AND some treats from yours truly...


  • #1, #2, #3 and #4 Wilton tips to go on those icing bottles
  • Tip Covers to, well, cover your tips
  • a 3-pk of circle cutters to make the donuts
  • 3 bottles of  AmeriColor Gel paste in Bright White, Chocolate Brown and Soft Pink to color your icing
  • Cookie bling - Jimmies and Non-Pareils to top off your donuts
  • a bottle of Wilton Glycerin, should you like to try making my Royal Glaze
  • ...and last but not least, a $5 Dunkin' Donuts gift card, to give yourself a coffee break while your cookies are drying ; )

*****
 

4 Ways to Enter:

  • Post a comment here on my blog - feel free to say something sweet about Karen's, BRP, PIP and/or yours truly;

  • Post a comment on my Facebook wall - make sure to mention this giveaway;

  • Follow my blog.  (If you follow by email, post it to tell me since I can't tell that you're following.  If you follow by Google, I can see that, and you get an automatic entry);

  • Like my FB page, and post on my wall that you're a new fan from my blog.
 
*****
 

Enter thru Wednesday 10/3, winner will be posted by 10/5  - good luck!
 
*****
 
And be sure to visit Karen's Cookies, BRPBoxShop and Plastics in Print for your cookie needs!

*****
 
Ok, I'm finally off to my coffee break!

Friday, September 21, 2012

Pressed (for time) Flowers


One of the reasons this mini flower is among my favorite go-to cutters is that I can make some pretty flowers, pretty quickly.  If I have a lot of cookies to do things on my plate and need something sweet and quick, these flowers are it.  And it's not like they are something I just "threw" together - remember, there's still the making of the dough, the icing, the cutting, baking, etc. that goes in to the whole process.  So, if you are the recipient of these flowers, although my schedule may have been crazy, and I was pressed for time, know that lots of love went into them,  and I wanted you to have something pretty from me : )

*****
 
So, you've made the dough and icing, & cut and baked your cookies.  You will need 2 colors in Royal Glaze consistency (somewhere between flood and piping, where it will settle on its own, without any help) - I really like white and yellow for these.  This flower cutter has 6 petals on it which makes things easy.  You are going to flood every other petal, and let those set for 5-10 minutes, more for glazers. (I know, at this point they look really weird, but not for long...)  I did a few dozen here, so by the time I was done with the last, the first was set enough for the next step.  Now, flood the last 3 petals on each cookie.  Since the first petals aren't really dry yet, make sure you don't dig the tip into them when moving your icing around.  (yes, I know they still look weird...stay with me...)  Let them set for 5-10 again, or if you did a lot, the first one should be ready.  Take your second color and holding the tip straight over the center about 1/8" above the cookie, squeeze straight down until the center is big enough to "separate" the petals.  The tip will eventually be "in" the icing as you are squeezing - that's fine, don't move the tip and it will build a nice big puffy circle.  That's it - you're done!  Let 'em dry, then pack 'em up for someone special! 


 *You may notice on the dried cookies that the centers of the petals are slightly recessed - I actually do that on purpose because real petals are actually like that. The way I flood to get this is to outline the petals with a little more pressure than I flood the centers - if I leave the icing to settle on its own, they just dry that way.*
 
 
*****
 
Some of these are going to a a very special friend of mine who recently lost Cupid, her best buddy in the whole wide world of almost 15 years, and I wanted to cheer her up.  And because she made me the sweet platter I have the cookies on at the beginning of the post...

 
I hope she doesn't see this post before she gets the cookies, but if she does... Hey, Jodi - watch for these, they should be there by Monday.  And don't worry, you don't have to eat Cupid - I won't mind : )  Love you girl!
 
RIP Cupid.

Thursday, September 13, 2012

Shipping Discovery! (plus tutorial)


I just love making small cookie sets for gift-giving!  Nothing too big, just enough to tell someone thank you, or Happy Birthday, or simply that you are thinking of them.  I used to package them in cello bags with a cute ribbon, until BRPBoxshop came out with their new cookie boxes.  The small size, I have found, is just perfect for these little sets!  With a nice sized scalloped window, and using colorful shred to nestle the cookies in, they couldn't be more perfect.  The problem with these small sets is that some people want them shipped.  And we all know that packaging for shipping isn't usually a pretty thing, since you can't really present the gift box as-is - the cookies will slide around, and they need extra cushion to prevent breakage, plus the cost of shipping!  Welllll... yesterday I made a major discovery - the small cookie boxes from BRP fit perfectly into...are you ready...a SMALL FLAT RATE Priority shipping box!  I thought nothing would ever fit in those dang small boxes!  And I thought for sure I would have to ship this Mickey & Minnie gift box in a medium Priority box, which is twice the price.  Not so!  And the small flat rate boxes are only $5.35 ($5.15 if you print your labels online.) AND the boxes are free.  AND they will even pick it up at your door!  I WAS JAZZED!  So I thought I'd show you, since I know you're shaking your head and rolling your eyes at me - just like you I have never actually fit anything into those small flat rate boxes.  Which is why I had them laying around - I brought them home, and was never able to actually use them!
 
*****
This is all you'll need:
small BRP cookie box, small flat rate priority box,  a bit of tissue paper (I recycle mine from my shipments from Karen's Cookies - thanks Mike!), a bit of shred, a bit of bubble wrap (also recycled), tape, a piece of sturdy cardboard (not shown - sorry - but also recycled, from another Priority box :) and, of course, your cookies.
 
 
*****
Take your tissue and line the box with it.  Place the cardboard on top - it should be smaller than the lining of the box.
 
 
*****
 
Take your wrapped cookies and make inside-out tape rolls/loops (so the outside is sticky) and stick them to the backs of your cookies.  Place & stick the cookies onto the cardboard so they will show nicely thru the box window.  Note I covered my cardboard with yellow cardstock to make it blend better (unless you are using, say, white shred : ) - you could also use cute themed scrapbook paper.


*****
 
Stuff shred around the cookies - where there is packaging, put some shred under to make it look like it's sitting in shred - but do not put shred between the cookie and the cardboard - it will defeat the purpose!  You want the cookies sitting right on top of something that will not bend.  Also, stuff extra shred along the outside where you can - build it up as much as you can so that it will be right up on the inside of the lid when closed - this makes it so there is no movement of the contents of the box.  You can add a little card, tag or your business card/sticker on it (again, sorry, forgot the pic!)


*****
Take a piece of bubble wrap (the small bubbled kind) just big enough to cover the top and sides of the cookie box - no need to cover the bottom since a) there is already cushioning inside the bottom of the cookie box and b) this makes a perfect fit inside the priority box - with NO MOVEMENT!
 
 
*****
I wish you were here to shake the box - nothing moving in there at all!!!!  And in case you are wondering if this is really enough cushion... I normally ship cookies "floating box-in-box" style, but not with these.  This shipping box is small, and unlike the larger boxes, its small size makes it much sturdier!  I couldn't push it down in the center at all.  You may, however, want to add some "FRAGILE & PERISHABLE" labels, and maybe give a few cookies to your postal carrier...
 
 
*****
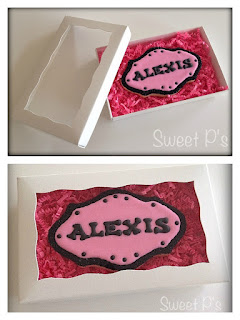
Here is a plaque cookie that I made using a Plastics in Print (PIP) cutter - fits sooo perfectly in the box!  Next time I would add a few minis to this one...


Here is another plaque that fits just right...
 
 
  Also, my cupcake and candle gift boxes are in this box as well. (not the best pic sorry!)


*****
 
And there you have it : )
 
*****
 
As I mentioned in a few previous posts, there is a GIVEAWAY coming...including some items that were donated by three of my favorite vendors...here's a hint...these vendors were all mentioned in this post...and USPS is not one of them! Watch for it in the next few weeks, or days, depending on what life throws at me!
 
*****
 
Happy Baking & Shipping!


Friday, September 7, 2012

Friday's Funny

Just having some fun with today's cookies... I couldn't resist!


Don't forget... a GIVEAWAY is coming, so check back soon!
 
Happy Friday!

Sunday, September 2, 2012

Puffy Icing & RIT's


Remember the good old days of puffy stickers?  They were the coolest thing ever, and we girls used to collect them - we even had sticker albums full of them!  Now there is even puffy paint, puffy pens... It just looks cool!  I don't collect stickers anymore, but I do make cookies that might, somehow remind me of them... Today I'm going to show you a quick way to get the same effect.  It is a great technique for lots of things, like cupcakes, ice cream, and especially pumpkins.  (I might add, that I used to collect scratch'n'sniff stickers, too, but you don't need to scratch cookies to smell their yumminess!)
*****
Also, I'll do a quick tutorial on how I make Royal Icing Transfers (RIT's).  This is an icing image (in this case, letters) that is made ahead of time.  You ice the image on a sheet, let it dry, remove it from the sheet it dried on, and drop it on wet icing. 
*****

To make these letter RIT's, first I put my cutter up to my computer screen with the word I want to create, and size it so that it will fit on the cookie.  Then, I copy & paste it as many times as I will need to ice it, print it out, and slide it in a laminating pouch.  I like the pouches because I don't have to tape anything down - the printed sheet doesn't move once it's in there.  (I got these 4X6 pouches at Target - 5 for $3.99.  You can also get larger sizes, but they are pricey. They are reusable, though - simply wipe them down with a dry cloth when you're done.) *** Update*** I now use page protectors for my transfers - I found heavy duty ones at Costco that were too good to pass up - $11.50 for 250 & they work great!***

*****
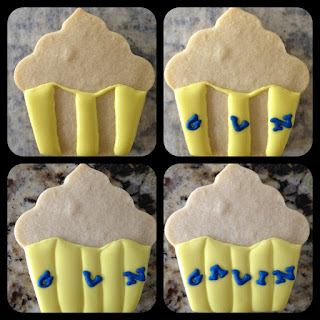
Anyhoo, wipe some Crisco over the area you will be icing on - not too little & not too much... (too little and your RIT's may stick, and too much will make them difficult to remove - it makes kind of a suction.).  You don't really want to see any white Crisco - that would be too much : )  Next, pipe over the letters.  A coupler is handy here - I wasn't sure what size tip I needed, and wound up using the third one I tried... the A's just kept closing up on me : )  Practice, practice, practice!  And always make extra, because some are bound to break, no matter how careful you are.  But these were quick, so I didn't mind, and if they don't break, you can save the extras.  (And this very special cookie is for my cutie-pie nephew, and I'm sure to use his name in icing again at some point!)  The next step is very important...  LEAVE THEM ALONE TO DRY FOR AS LONG AS YOU CAN!  I can sometimes get away with 6 hours, sometimes 12, but I prefer to leave them for 24 hours if I have the time, especially with fragile things like letters.  They won't get any harder than they are once they are dried, so not to worry.  You can store these in a sealed container for like, forever!  (Well, I wouldn't really know that, I'm not that old!)

*****
Once they are dry (*see a tip I added in below the next pic), carefully take tweezers - I prefer the offset kind (I don't need to tell you that they must never have been used for, well, actual tweezing...) and carefully remove the transfers.  I like to slide them over a little at the strongest point to make sure they will come off first.  If you are using parchment, slide it slowly off the edge of a corner (table, book etc.) bringing the paper down at a 90 degree angle (holding both ends of the paper) & the transfers should pop off.  I have broken too many letters using parchment, so that's another reason I use the laminating pouches.  Anyway, you can then drop them on a dry cookie and see how you would like them placed - take a pic if it will help you remember where to place them once your icing is on. 


* OK, I am adding a tip on removing the transfers. Because I just had a bunch of cookies to do, and found out last minute that they needed to be done a day earlier... and I wouldn't have time for the base coat to dry before adding detail (black on white - I did NOT want to chance bleed here)... so late night RIT's to the rescue! I tried not to use that much Crisco because they were thin shapes - very fragile & delicate, but alas, I didn't use enough! And the Crisco kinda "dried" on the sheets. Which made the first 4 I tried to take off a broken mess. Soooo I took my heat gun (really an embossing gun, which is really just like a hair dryer on low) and blew it on the sheets, heating & "melting" the Crisco (yet not close enough to scorch the RIT's) and the darned RIT's slid right off! I was ELATED because I no longer had a spare moment to spend on these cookies!  The RIT's didn't take that long to do and when it came time to decorate those cookies, well, let's just say I'm soooo glad it worked out and I finished in time! Hope that helps if you ever get "stuck" (hehehe!)

*****
Now, it's time to make that puffy sticker icing look.  It is done by icing in sections, and allowing them to dry for a bit before adding the section next to it.  Here, I did the first 3 since they weren't touching, and then waited about 10 minutes in between sections - glazers will want to wait longer than that.  While the icing is still wet, you can carefully drop your RIT's on - you can move them around a little bit with a toothpick, and then lightly press down the sides so they are totally touching wet icing.  If any part of the RIT is not touching, when the cookie is dry, the transfer may break off at that point. 


*****
Next, the icing on the cupcake.  Same way, one section at a time.  I also dropped on some nonpareils while each section was wet.  Be sure not to drop any on the bottom section unless it is good and dry.  Again, I waited about 10 minutes in between sections. 


*****
All done!  And I didn't have to go back and add any details, which is always a nice plus : )  When you have lots to do, they go quickly.  If you have, say, a dozen, by the time the last is done, you can start on the next section of your first one.


*****
Here's another one I did - I like how it came out, but learn from my mistake here:  I piped the white first, and the blue second, which left the border a little chunky-looking.  I recommend that you do the bottom first, and then with your first adjoining top section, slightly overlap the bottom making it nice & smooth like my yellow cupcake : )


*****

That's it for today, but check back soon - a GIVEAWAY is coming... with some stuff that has been donated by yours truly, and 3 of my most favorite vendors...!  I'll leave you guessing, for now...

Happy Baking!